
Yo, what’s up, sky-gazers! Get ready for some serious celestial fireworks because the Northern Lights are about to put on a show across the US! We’re talking vibrant, dazzling displays of the aurora borealis, painting the night sky with electric green, purple, and even red hues. This ain’t your grandma’s meteor shower – this is a full-blown light show you won’t want to miss. Prepare to be amazed!
This epic aurora forecast covers everything from prime viewing locations and the best times to catch the action, to the science behind this cosmic spectacle and some killer tips for snapping Insta-worthy pics. Whether you’re a seasoned aurora hunter or a total newbie, we’ve got you covered. Let’s dive into this electrifying event!
Geographic Scope of Aurora Visibility
Yo, what’s up, aurora chasers! This forecast is straight fire, predicting some seriously epic Northern Lights shows across the US. But where exactly should you be staking out your viewing spot to catch the best glimpse of this celestial light show? Let’s break it down.
Aurora viewing isn’t a one-size-fits-all kinda deal. Your chances of seeing the lights depend on a few key factors, like how strong the solar activity is, how clear the skies are, and how much light pollution is around. Basically, the further north you go, the better your odds. But even some southern states might get a peek if the solar storm is intense enough.
Aurora Visibility by State
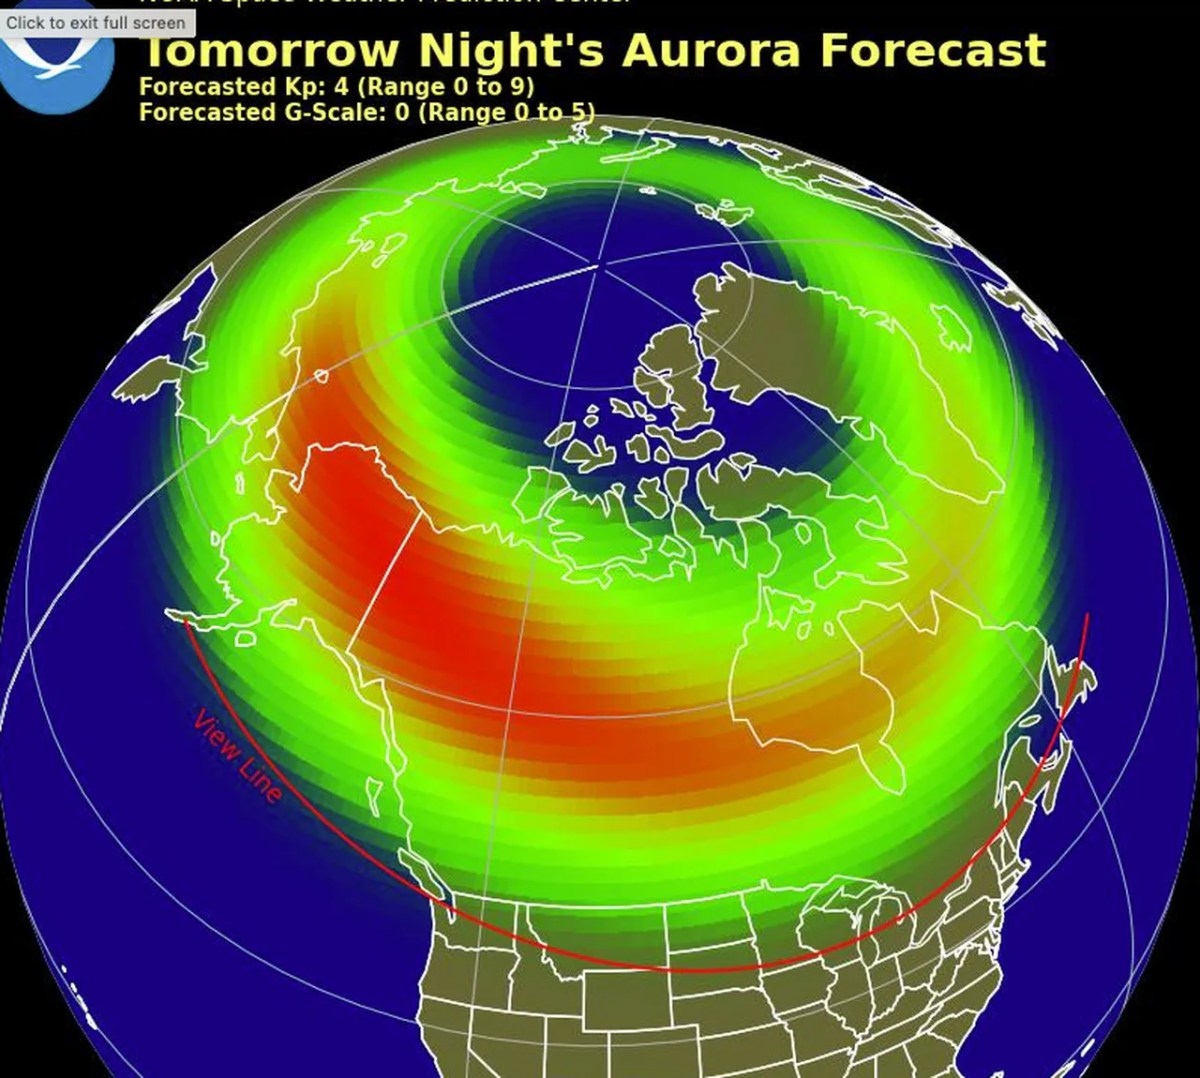
Predicting exactly where the aurora will be visible is like predicting the weather – it’s a bit of a crapshoot! But based on past events and current forecasts, we can give you a pretty good idea. We’re using a color-coded system to represent the intensity of the aurora, with darker colors indicating a higher probability and brighter visibility. Think of it as a celestial heat map.
| State/Region | Predicted Aurora Viewing Conditions | State/Region | Predicted Aurora Viewing Conditions |
|---|---|---|---|
| Alaska | High Probability – Very Bright | Washington | Moderate Probability – Faint to Moderate |
| North Dakota | High Probability – Very Bright | Montana | Moderate Probability – Faint to Moderate |
| Minnesota | Moderate Probability – Faint to Moderate | Idaho | Low Probability – Very Faint |
| Oregon | Moderate Probability – Faint to Moderate | Wyoming | Low Probability – Very Faint |
| Michigan | Low Probability – Very Faint | Maine | Low Probability – Very Faint |
| Iowa | Very Low Probability – Barely Visible | New York | Very Low Probability – Barely Visible |
Think of this table as a general guideline. For example, during the massive geomagnetic storm of March 1989, the aurora borealis was visible as far south as Texas! However, that was a pretty extreme event. More typical displays will be confined to higher latitudes.
Factors Affecting Aurora Visibility
Okay, so you’ve got your location picked out. But even with a killer aurora forecast, there are still a few things that can throw a wrench in your plans.
Light pollution is a major buzzkill. City lights wash out the fainter auroral displays, making them nearly impossible to see. To maximize your chances, head to areas with minimal light pollution – think national parks, rural areas, or even just getting away from city centers. Think of it like this: the darker the sky, the better the show.
Weather is another wildcard. Cloudy skies will completely block your view, no matter how strong the aurora is. So check the forecast before you head out – clear skies are essential. Think of it like trying to watch a movie in a thunderstorm. You won’t see much!
Aurora Intensity and Timing
Yo, aurora chasers! Get ready to witness some seriously epic light shows because the Northern Lights are about to go OFF. We’re breaking down exactly how intense these displays will be and when you should be glued to the sky. Think of this as your ultimate guide to nailing the perfect aurora viewing sesh.
This forecast uses the KP index, the ultimate scale for measuring geomagnetic activity. The higher the KP number (ranging from 0 to 9), the more intense the aurora, and the further south you’ll be able to see it. We’ll break down what each KP level means for your viewing potential, and when you can expect the best show.
KP Index Levels and Aurora Visibility
The KP index is like the aurora’s hype meter. A KP of 0 means, sadly, no aurora action. But, a KP of 9? Prepare for a mind-blowing, possibly even visible-from-the-tropics light extravaganza. Here’s the lowdown on what to expect at different KP levels:
| KP Index | Aurora Visibility |
|---|---|
| 0-2 | Minimal or no aurora visible, even in high-latitude regions. |
| 3-4 | Faint aurora visible only at high latitudes; a subtle glow on the northern horizon. |
| 5-6 | Aurora visible at mid-latitudes; vibrant displays are possible, potentially reaching further south. Think colorful curtains dancing across the sky. |
| 7-9 | Strong aurora displays visible at lower latitudes; intense and vibrant displays with possible aurora borealis sightings even in unusually southern areas. Imagine the whole sky painted with vivid colors! |
Predicted Peak Aurora Viewing Times
Alright, let’s get down to the nitty-gritty: when to be staring skyward. These are prime times for aurora viewing based on the current forecast. Remember, these are predictions, and weather conditions could affect visibility.
- Night 1: Peak viewing between 11 PM and 2 AM. Expect a KP of 5, meaning a decent show, especially in northern states.
- Night 2: The aurora’s gonna be strongest from midnight to 3 AM. We’re predicting a KP of 6, which could mean some serious southern sightings.
- Night 3: The action starts early! The best viewing will be from 10 PM to 1 AM, with a forecasted KP of 4. This might be a more subtle show, but still totally worth it.
Remember, these times are estimates. Keep an eye on real-time aurora forecasts closer to the viewing dates for the most up-to-the-minute info. It’s all about being flexible and ready to jump into action when the lights decide to put on a show. Don’t sleep on this!
Best Viewing Locations and Practices
Yo, aurora chasers! So you’re hyped for the Northern Lights show? Sweet! But just knowing they’re happening isn’t enough. You gotta know where to go and how to get the best view. This section’s all about maximizing your aurora experience – think epic photos and mind-blowing memories.
Finding the perfect spot to witness the aurora borealis is key. Factors like elevation, light pollution, and a clear view of the northern horizon are total game-changers. Higher elevations offer less atmospheric interference, leading to crisper views. Darkness is obviously crucial – get away from city lights! And finally, make sure you have an unobstructed view of the northern sky; trees, buildings, or even hills can block your show.
Recommended Aurora Viewing Spots Across the US
Here’s the lowdown on some prime aurora-viewing locations across the US, broken down by region. Remember, aurora sightings depend on solar activity, so even the best spot might not always deliver. But these places consistently offer the best chances.
| Region | Location | Why It’s Awesome | Tips |
|---|---|---|---|
| Northern Alaska | Fairbanks | High latitude, dark skies, and established aurora viewing infrastructure. | Check out Chena Hot Springs Resort for a warm soak while you watch. |
| Northern Minnesota | Grand Marais | Dark skies, minimal light pollution, and proximity to Lake Superior. | Head to the North Shore for stunning views over the lake. |
| North Dakota | Theodore Roosevelt National Park | Vast open spaces, minimal light pollution, and a dramatic landscape. | Find a high point within the park for optimal viewing. |
| Montana | Glacier National Park | Dark skies, mountainous terrain offering varied viewing points. | Many areas within the park offer stunning views, especially away from developed areas. |
Essential Equipment and Practices for Aurora Viewing
Gear up, fam! Having the right stuff can make all the difference between a “meh” aurora sighting and a mind-blowing experience.
First off, dress warmly. Seriously, like you’re going to Antarctica warm. Layers are your best friend. Think thermal underwear, fleece, waterproof outerwear, hats, gloves, and warm socks. You’ll be standing outside for a while, and hypothermia is no joke.
Next, consider bringing a tripod for your camera. Long exposures are key to capturing the aurora’s ethereal glow. A wide-angle lens will help you capture more of the sky. A remote shutter release will minimize camera shake during long exposures. And don’t forget extra batteries – the cold can drain them fast.
Camera settings are crucial. Experiment with different ISO settings (start around 800-3200), aperture (f/2.8 or wider if possible), and shutter speed (anywhere from 10-30 seconds, depending on aurora brightness). Manual focus is your friend here, set to infinity. And finally, learn how to use your camera’s bulb mode for even longer exposures if the aurora is particularly bright. Practice before you go!
Finally, be patient! The aurora is a natural phenomenon, and it doesn’t always cooperate. Be prepared to wait, and don’t get discouraged if you don’t see it immediately. Sometimes, the wait is part of the magic.
Photography and Image Creation
Yo, capturing the Northern Lights? It’s like, the ultimate photography challenge, but totally worth the effort. Think epic landscapes bathed in otherworldly green, purple, and even red hues – it’s a vibe. Getting that shot requires some serious skillz, but trust me, the results are Instagram-worthy, like, seriously.
Camera Settings for Aurora Photography
Dude, your camera settings are key to snagging those aurora shots. You’re gonna need a camera that allows manual control – no auto mode here! Think low ISO (around 800-3200, depending on your camera and the brightness of the aurora), a wide aperture (like f/2.8 or wider if your lens allows), and a long exposure (anywhere from 10 seconds to several minutes). A tripod is your best friend – absolutely essential for sharp images with those long exposures. Experiment with different settings to see what works best in your specific conditions. Remember, it’s all about finding that balance between capturing enough light and avoiding overexposure. For example, if the aurora is super bright, you might be able to get away with a shorter exposure and higher ISO, while a faint aurora will need a longer exposure and lower ISO.
Composition Techniques for Aurora Photography
Framing your shot is as important as your camera settings. Think about including elements in the foreground to add depth and interest to your image – maybe a snowy tree line, a cabin in the woods, or even a dramatic mountain range. The rule of thirds can be your friend here – don’t center the aurora; instead, place it off to one side to create a more dynamic composition. Leading lines, like a road or river, can also guide the viewer’s eye towards the aurora. Imagine a photo where the aurora explodes across the sky above a perfectly silhouetted lone tree – that’s some serious composition right there. And don’t forget about the sky itself! The aurora often interacts with the stars, creating a stunning interplay of light and color.
Post-Processing Tips for Aurora Photography
Okay, so you got the shot, but it’s not quite *perfect* yet. Post-processing is where you can really make your aurora photos pop. Software like Lightroom or Photoshop can help you adjust brightness, contrast, and saturation to enhance the colors and details of the aurora. Noise reduction is also crucial, especially with long exposures at high ISOs. You can subtly enhance the colors to bring out the vibrancy, but don’t go overboard; keep it looking natural. Remember, the goal is to make the image look like what you saw, only even more awesome.
Visual Characteristics of the Aurora Borealis
The aurora’s a total chameleon! Sometimes it’s a soft, shimmering curtain of green, other times it’s a dynamic dance of vibrant greens, purples, and reds. The colors are caused by different gases in the atmosphere colliding with charged particles from the sun. Oxygen gives off green and sometimes red, while nitrogen produces blue and purple. The aurora’s movement can be slow and graceful, or fast and chaotic – like a cosmic light show. It can be a faint glow on the horizon or a brilliant display that fills the entire sky. Think of it as nature’s own psychedelic light show – totally unpredictable and breathtaking.
Challenges and Rewards of Aurora Photography
Let’s be real, capturing the aurora isn’t a walk in the park. The weather can be brutal – freezing temperatures, wind, and snow are common. Finding a dark location away from light pollution is also essential. Plus, you’re dealing with unpredictable aurora activity – sometimes it’s there, sometimes it’s not. But dude, the rewards are epic! There’s nothing quite like seeing the aurora borealis dance across the sky, and capturing that moment in a photograph is a seriously rewarding experience. It’s a testament to your patience, skill, and perseverance. Plus, those photos are going to be the envy of all your friends.
So there you have it, folks – your ultimate guide to witnessing the awe-inspiring aurora borealis. From understanding the science behind the shimmering lights to knowing where and when to catch the best views, you’re now equipped to experience this incredible natural phenomenon. Grab your friends, pack some warm clothes, and get ready for an unforgettable night under the stars. Don’t forget to share your pics – we wanna see those amazing aurora shots! Peace out!
